Toward our Greener Home
A selection of greener home projects we at
Cutting the water drain
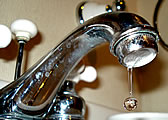
March 2008: The March focus for greening your home was on reducing the flow of unnecessary water going down your drains. During a recent WECAN/WV Sustainable Communities Project event in Morgantown, I received two nifty little money savers, a 1.5 g/minute water faucet aerator and a "toilet tummy" from AM Conservation Group .The purpose of the aerator is to reduce the flow of water while maintaining the pressure. This is done by restricting the size of the faucet opening. Less water is coming out but the amount of water trying to get through is the same so the pressure remains high. The toilet tummy is a plastic bag that is filled with water then hung inside the toilet tank. Because the bag takes up room, less water is needed to fill the tank after each flush.
Quite frankly I was a little leery about the loss in quality of life involved with both. I was afraid that the aerator would leave the water flow too weak and that not enough water would come out during each flush to do the job. You see I had already filled up a discarded large mouthwash bottle with water and sunk it in the toilet tank several years ago. This had worked very well with no problems so I thought that removing more water per flush might be too much.
Well, I was wrong on both accounts. I put the toilet tummy in over a week ago and even though I now have removed a total of 3 liters (over 3 quarts) of water from each flush we can't tell the difference. The aerator was even more impressive. I installed the aerator on the bathroom sink in less than a minute and turned it on. At first I was disappointed. It didn't seem to make a bit of difference. Same pressure from apparently the same flow. I removed it again to compare it to the old one and they looked different so I decided to run a test. First I put my mouth rinsing cup (you know, the one I placed on my sink back in October, 2007) under the faucet without either aerator and turned on the faucet full blast. I timed it filling in two seconds. I did it several times to test my results. Then I did the same for the old aerator. That took two seconds each time as well. Finally I tried it with the new water-saving aerator. Very much to my surprise it took four seconds each time. Me being me, I switched out the aerators several more times but always got the same results. Brilliant. When I put my hands under the faucet now it feels like twice the amount of water is flowing than really is.
Final results, I'm now saving three liters of water on each flush and using half the amount of water each time I turn on the bathroom sink faucet. And neither action is noticeable in our day to day life. This has turned out to be an excellent example of so many of the things we can do around the house where we can rest assured that we are saving money, saving wear and tear on our home systems, and saving the environment all without a change in our routine or quality of life.
my cost: zero. these were public event giveaways. Pay attention to local announcements because green groups are regularly handing out money/earth saving products for free to get you involved. At this same event they were handing out
testing our refrigerator for proper temperature control
February 2008: As my at-least-one-thing-to-do this month I put an appliance thermometer in the freezer and then in the refrigerator to test the temperature. A refrigerator/freezer that run too warm can be a hazard to the health of your family while running colder than necessary is a hazard to your checkbook and the environment. We had mixed results. I am happy to report that our freezer registered just under 5° F but our refrigerator ran at 42° F, not quite within the best range for safety, economy, and environment. To test your refrigerator/freezer check out the February 2008 entry on the One Thing This Month page.
my cost: $5.99 for a TruTemp freezer guide thermometer at Target
tightening up our home envelope from the inside: a unique "our greener home" project.
Every home is different but 100 year old homes seem to be more different at times. We have an old coal room on the basement level with a coal/dirt floor and stone walls. Because the room is poorly insulated and smells a bit earthy, we'd like to insulate it from the rest of the house but unfortunately, the water pipes run through it for the laundry and bath rooms. Till now we haven't had time to deal with the room but this year we've decided to do something about it. We're going to put up insulation around the walls in the adjacent rooms and plug up all the holes that we can, thus separating it somewhat from the rest of the basement and the living area in general. Then we'll rely on the heating ductwork that runs through it to keep it above freezing.
Since the walls in the main basement area that adjoin the coal room only have a covering on one side of the studs, we're going to add rigid insulation between the studs there and plug up the wiring and pipe holes between the ceiling joists. On the side that adjoins the furnace room, the walls are plastered stone up to the joists with a wood door and window with ductwork running through it providing the openings. We'll insulate the door and window opening as best we can and plug up the between-joist openings here as well. We've already covered the coal room's outside window and old exterior door with plywood, foamboard, and leftover cellulose insulation from last year's major insulation work.
7-8 January 2008: Starting insulating the wood wall between the main basement and the coal room. Because this is really just a temporary fix until we make our final decision on what to do in that area, I'm cutting pieces of the styrofoam insulation into strips, fixing them between the studs, then filling the resulting gaps with excess cellulose insulation.
3 November 2007: Bought, Great Stuff gap filler, caulk, and styrofoam insulation sheets at Lowe's.
tightening up the home envelope by sealing the dryer vent
22 October, 2007: Ever since we moved into our home, the clothes dryer vent has been sucking conditioned air out into the yard. Because the lint had built up around the exhaust flap, it always stood open. The hole was not properly sealed around the exhaust pipe allowing more air to escape and because the pipe was about six inches too long, water easily got behind exhaust housing to our home's untreated wood exterior. It also just didn't look good.
To fix this I pulled the dryer out and disconnected the dryer hose from the pipe. Then pulled the pipe out leaving a large hole in the wall. On the outside I disconnected the exterior dryer exhaust housing, took the flap out, and thoroughly cleaned all lint and dirt. I reconnected the flap to make sure that it could swing freely. I then trimmed the pipe down to size using tin shears and used aluminum tape to fasten the pipe to the dryer hose. Back outside I pulled the pipe through the hole and used exterior caulk to seal the pipe/wall opening. I then reconnected the cleansed exhaust housing and caulked that fully as well. Finished off by cleaning up the mess. I had not only plugged up an air leak but helped protect my home's exterior from the weather and made that area look a little nicer.
my cost: $3.28 for one tube of sealant
tools used: tin snips, aluminum tape, and all-purpose indoor/outdoor sealant
using the water meter to check for leaks in our home
15 October, 2007: Homes are a constant source of DIY projects and ours is no exception. Some are cosmetic but many fall into the greener home category. We recently noticed a leak in our kitchen faucet which got us to thinking about the broader water picture. One drop per second from a leaky faucet can equal 2,700 gallons/year of wasted water. But faucets aren't the only culprits. You can be losing water from the toilet tank into the bowl or somewhere within the pipe system without even knowing it. Therefore we decided to check the whole system at once.
To do this we'll first read the water meter to establish a base number. Then after two hours of absolute no use, we'll read it again. When we see how much we're losing, we'll start checking for costly leaks. We already know about the kitchen faucet. We'll do some fix up work then run through the water meter check again. To understand how to find and read your meter go to the Morgantown Utility Board's website.
17-23 October: We decided to check our water meter Wednesday night before heading out to Bible study then recheck it after we got back but what I thought must be the meter was actually the natural gas meter. Went back out Monday night and spent half an hour looking for it near the road, in the house, around the yard, etc. to no avail. Tuesday I called the Morgantown Utility Board (304-292-8443) and asked for help. They told me that it was two feet right of the driveway, an area that has had a bunch of gravel washed over from the recent heavy rains. I'll go back out looking for it later this week.
27 October: After poking around some more, we still can't find the phantom meter. Well, when it comes right down to it, we know we have a kitchen faucet leak so we'll just fix that and check other possible leak locations another way. Consider this an educative experience and move on.
my cost: A little frustration but this shouldn't happen to you. If it does let us know.
tools used: a shovel to push some gravel around.
reducing water usage in the bathroom
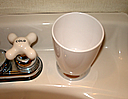 10 October 2007: I recently read in a magazine that a simple way to reduce water waste was to put a cup on the bathroom sink for use while brushing your teeth. I must admit that without thinking I would turn on the faucet to wet my toothbrush then keep it running until the final spit and rinse. Also for some reason I usually turned on the hot water to do this. No more. We bought a tumbler at Target today that matched our sink and proudly placed it for immediate use. I've also pledged to use the cold water as well.
my cost: $5.99
tools used: brain
new hall wood floor
 August 2007: When we decided to restore the original living room wood floor, we knew we'd come up short of enough usable wood planks. We made the decision to "harvest" wood from the hall to finish off the living room. We would then, with the money we saved, splurge on getting
my cost: $217.80 for 80 feet of select and better 2¼" red oak flooring at the Glenmark Center Lowe's
tools used: manual flooring nailer, dual bevel compound miter saw, and a simple assortment of hammers, squares, etc.
We've completed many more projects over the last two years having to deal with air quality, heating, furnishings, insulation, lighting, etc., etc. We'll be adding to this list to let you know how and what we've done as the weeks go by.